![]() Introduction for Macintosh/Windows Midi Quest Owners
Introduction for Macintosh/Windows Midi Quest Owners
This introduction was created specifically for those who are already familiar with Midi Quest on the Mac or Windows. If you are new to Midi Quest or want a refresher, please proceed to the standard Introduction chapter. With your existing Midi Quest experience, this one chapter is intended to get you up and running on the iPad.
MidiQuesti, Midi Quest for the iPad, brings many of the same tools found on Windows and Macintosh to the iPad. On the iPad, Midi Quest makes maximum use of the available screen space so the larger the screen you have, the more you will be able to see of the larger editors.
Midi Quest Layout

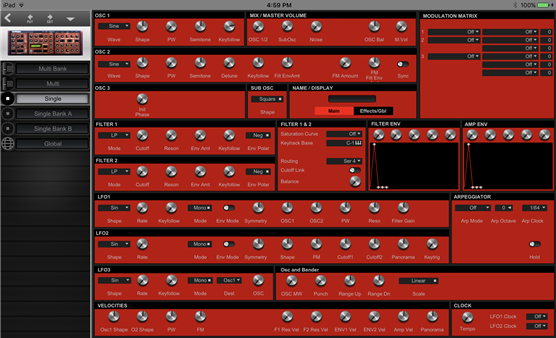
The Midi Quest screen is divided into three main sections. Section 1 in the upper left is the Studio View. This is where all of the main editing and organization functions are performed.. Section 2 is is the Resources View. This where additional SysEx resources that are not part of the SysEx currently being edited can be accessed. Section 3 is the Status View. It provides MIDI activity monitoring and keyboard output.
The Resource and Status Views can easily be added to and removed from the screen as required by tapping an "X" or using swipes so the entire screen can be dedicated to editing when required.
The Resources View ![]()
![]()
![]()
The Resource View (#2 in the sample image) contains 3 subviews, all of which are found in the Windows and Mac versions of Midi Quest: the Patch Zone, Collection, and Library. The displayed views is selected with the tab at the bottom.
To toggle the Resource view tap the Resource View icon in the button bar or....
To open the Resource view, edge swipe from the right hand side of the ipad or...
To close the Resource view, perform a left to right swipe in the Resource view.
The Patch Zone
To display the Patch Zone, select "Patch Zone" from the lower tab in the Resources view.
The Patch Zone accesses Sound Quest's online resource of over 180,000 patches. The view is context sensitive so its contents will change as you switch between instrument modules and the editors in each module. Remember that while there is a large number of patches, there are many instruments for which there are none. If you know of a patch resource that Sound Quest can access to add patches to the Patch Zone, please contact us.
To audition a patch in the Patch Zone, simply click on it. The patch is downloaded from the Patch Zone, transferred to the instrument and auditioned.
To edit a patch from the Patch Zone, display the patch editor in the edit view then double click on the patch in the Patch Zone. Midi Quest will move the patch from the Patch Zone into the editor replacing the current contents of the editor.
To transfer a patch from the Patch Zone into a bank, display the bank editor in the edit view, preselect the location in the bank where the patch is to be stored and double click on the patch in the Patch Zone. Midi Quest will transfer the patch from the Patch Zone into the bank, overwriting the current contents.
The Collection
To display the Collection, select "Collection" from the lower tab in the Resources view. The Collection is essentially the same as a Collection Window in the Mac or Windows version of Midi Quest. The differences are that the SysEx stored in a Collection can't be edited directly (it must be transferred into the Set editor) and the Resource Collection can't store full Sets.
The iPad version of Midi Quest supports one multi-use Collection. This Collection stores an unlimited number of patches and banks from any combination of instruments. Use the Collection as a place to collect SysEx so that it is generally accessible or to transfer between studio setups.
To send SysEx to the instrument, select an entry in the Collection and press the Put button in the button bar.
To transfer SysEx from the Collection into the main editor, first open the appropriate instrument Set in the Edit View. For example, an M1 Program Bank would need an M1 Set displayed. Double click on the entry in the Collection and Midi Quest will transfer the SysEx. A bank will replace an existing bank in the Set. Individual SysEx will replace the corresponding SysEx in the Set.
The Collection creates a Midi Quest 12 compatible Collection (.sqc) file.
The Library
To display the Library, select "Library from the lower tab of the Resources view.
Similar to the Mac and Windows versions of Midi Quest, the Library stores a single type of SysEx. This view is context sensitive and will automatically change to display the Library for the SysEx currently being edited. Unlike the Mac and Windows versions, there is only one Library per type of SysEx. Use the Library to build your sounds for a given instrument.
To audition a patch in the Library, tap it.
To copy a patch to an editor, display the editor in the Edit View and double click on the patch.
To copy a patch to a bank, display the bank in the Edit View, select the location the bank to receive the patch, and double click on the patch in the librarey.
The Library creates Midi Quest 12 compatible Library (.sql) files.
The Status View ![]()
![]()
![]()
The Status View (#3 in the sample image) contains two sub-views, the Monitor View and the Keyboard View. To toggle between the two views, click in the icon in the upper right corner of the Monitor View when it is displayed.
To toggle the display state of the Monitor View, tap the Monitor View icon in the icon bar, or...
To display the Monitor View, edge switch up from the bottom of the iPad screen, or...
To hide the monitor View, tap on the "X" at the right hand side of the window or perform a two finger downwards swipe in the Monitor view.
The Monitor View
The Monitor View shows the same MIDI IN, MIDI OUT and app status information as in the Windows and Mac versions of Midi Quest.
To scroll through the recorded MIDI and app events, slide your finger over the central display area of the view.
To switch to the Keyboard View, tap the keyboard icon in the upper right corner of the view
The Keyboard View
The Keyboard View displays a keyboard which can be used to play/audition notes to the currently displayed instrument. The keyboard is velocity sensitive where the lower you tap on a note, the greater the velocity. This is similar to the MIDI Controller window in the Mac and Windows versions.
To switch to the Monitor View, tap the Monitor icon in the upper right corner of the view.
The Studio View ![]()
![]()
![]()
The Studio View (#1 in the sample image), contains the core of Midi Quest's functionality and is where the majority of your time will be spent. This where SysEx is loaded from your instruments into Midi Quest to be backed up, organized, and edited. While you may not recognize it initially, you are looking at a Midi Quest Collection with a different interface. This Collection is also limited to storing Sets instead of the mix of Sets, Banks and Patches in the Mac and Windows versions. The files that the iPad version of Midi Quest creates are fully compatible with the Mac and Windows versions of Midi Quest 12.
From a SysEx storage perspective, the Mac and Windows versions tend to be focused on creating individual Sets containing the SysEx for a single instrument. Set files can be loaded and their SysEx transmitted to the instrument as required. Some may also store banks, individual patches and Sets in a Collection. The Collection would then hold all of the SysEx required for a given project or performance.
Midi Quest for the iPad takes a different organizational approach. The SysEx for all instruments is collected and stored in a single file, a Collection. Only one Collection can be loaded into Midi Quest for iPad at a time. To open a new project (referred to as a Studio), the current project must be closed. SysEx can also be stored in a Resources area which includes a single Collection file and a Library for each type of instrument SysEx.
The work flow for the iPad version of Midi Quest is a little different. For most people the Mac/Windows work flow is similar to this:
1. Select an instrument module in the Studio
2. Request SysEx from the instrument
3. The SysEx is received and displayed in the new window (usually a Set)
4. The SysEx is stored to disk or edited as a Set (.sqs) file
For the iPad version, the work flow is intended to be as follows:
1. Select an instrument module from the list of available modules
2. Midi Quest creates an instrument for that module and adds it to the Studio View
3. Select the instrument and use the "Get" button in the button bar to request the SysEx from the instrument
4. To save the Collection including the newly loaded SysEx, press the disk button on the button bar and name if necessary
5. To edit the loaded SysEx, double tap on the instrument in the Studio
The instrument's editor will appear in the space currently occupied by the Studio view.
All of the options which are required to manage the instruments in the Studio View are provided by the button bar across the top of the app. While the majority of the buttons apply to the Studio, a couple provide access to app wide features. The button bar provides the following features:
![]() Install, add, remove, and manage instrument modules and instruments
Install, add, remove, and manage instrument modules and instruments
![]() Open a saved Studio which is the SysEx for each installed instrument
Open a saved Studio which is the SysEx for each installed instrument
![]() Save the current Studio which is the SysEx for each installed instrument
Save the current Studio which is the SysEx for each installed instrument
Standard ![]() Cut,
Cut, ![]() Copy and
Copy and ![]() Paste functions for instrument SysEx stored on the clipboard
Paste functions for instrument SysEx stored on the clipboard
![]() Get and
Get and ![]() Put all of the SysEx for the selected instrument
Put all of the SysEx for the selected instrument
![]() View/Edit the SysEx for an instrument
View/Edit the SysEx for an instrument
![]() View/Edit the Communication Settings for an instrument
View/Edit the Communication Settings for an instrument
![]() View the Fast Tips Help for a given instrument or for Midi Quest as a whole
View the Fast Tips Help for a given instrument or for Midi Quest as a whole
Toggle the display state of the ![]() Resources and
Resources and
![]() Status Views
Status Views
![]() All Notes Off panic
All Notes Off panic
![]() Edit app Preferences
Edit app Preferences
The Instrument Editor ![]()
![]()
![]()
The Instrument Editor in Midi Quest for iPad is the same as the Set window in Midi Quest on Mac and Windows. To open the view, double tap on the instrument image or select the instrument and tap the edit button in the button bar. This will replace the Studio View with the Instrument View and you will recognize it as the Set editor.
Midi Quest actually has two type of editors, custom and standard editors. The majority of Sound Quest's editors are standard editors with a left strip containing a list of the SysEx components available to select for editing. The majority of custom editors have been created by Psicraft. These editors are fully integrated with the management and selection of the various components being part of the interface itself. Sound Quest's Kronos and OASYS editors are examples of custom editors.
In both cases, the interface operates almost identically to the Mac and Windows versions. Along with parameter editing, the additional functions are found in the pop-up menu. The menu is displayed by single tapping two fingers in the view.
In standard editors, to return to the instrument single tap on the back '<' button (the first button in the Set view's button bar). In custom editors, display the pop-up menu by two finger tapping in the editor. Select "Back", the first option in the menu.
About Menus
Midi Quest for iPad provides many of its options through pop-up menus. As described above, a view's pop-up menu is displayed by single tapping with two fingers. A major different between the iPad and the Mac/Windows version is how menus are displayed. In the Mac/Windows version, all available menu options are displayed and any options not available at the given time are disabled. With the iPad, only those options which can be executed immediately are displayed. If a given criteria to perform a function is not met, the menu option is not displayed.
Additional Notes
The next section will take you through a basic "Getting Started" tutorial for Midi Quest owners. This should get you up and running with Midi Quest on the iPad.